Mync | Manual
Editing Storyboard
You can register clips to be used in a storyboard, change the length and playback order of the clips, and perform other operations.

-
Clip editing operations such as sort and trimming can be performed in the thumbnail pane.
Registering Clip to Storyboard
After a storyboard has been created, register clips to be used in the movie.
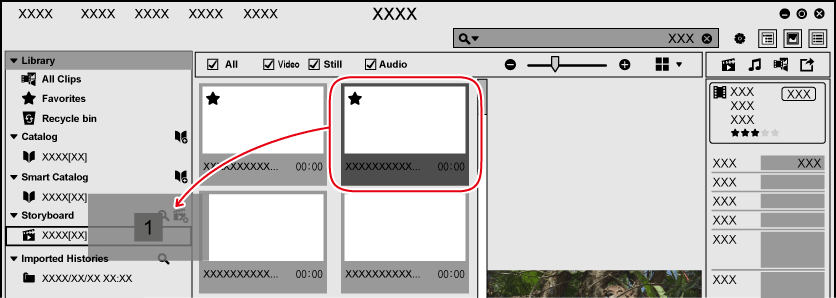
1) Drag a clip in [Library] and drop it onto the storyboard that you want to register the clip.
-
You can drag and drop clips from [All Clips], [Favorites], [Catalog], and [Smart Catalog].

-
The number of registered clips is displayed by type in the thumbnail pane.
-
The registered still image clips and video clips are displayed in the thumbnail pane in a linear style.
-
Music clips will not be displayed in the thumbnail pane. You can set them to use for the background music on the [Audio] view in the properties pane.
-
A still image clip is placed as a clip with 10 seconds length.

-
You can register multiple clips at one time. To select multiple clips, perform the following operations.
-
Click on a clip one by one with [Ctrl] on the keyboard held down.
-
Click on a clip on the top and then the bottom with [Shift] on the keyboard held down.
-
Deleting Clip in Storyboard
Delete clips registered to the storyboard.
-
The clips that have been deleted from storyboards are not deregistered from [Library].
1) Right-click on the clip to be deleted, and click [Remove from storyboard].
-
The clip will be deleted from the list.
Copying Clip in Storyboard
You can copy clips within the same storyboard.
1) Right-click on the clip to copy, and click [Duplicate].
-
The clip will be copied.
Dividing Clip in Storyboard
Cut a clip at the slider position and divide into two clips.
1) Move the slider to the position to cut a clip.
2) Right-click on a clip, and click [Cut].
-
The clip is divided into two clips.
 Alternative
-
To divide a clip at the slider position: [C]
Moving Clip in Storyboard
Storyboards are played back in order from the clip on the top of the thumbnail pane.
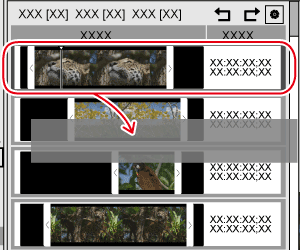
Clips in the thumbnail pane can be sorted as desired by drag and drop operation.
-
Select the storyboard to edit on the sidebar in advance.
1) Drag a clip in the thumbnail pane and drop it to the destination.

 Alternative
-
To move up a clip: [Alt] + [↑]
-
To move down a clip: [Alt] + [↓]
Trimming Clip in Storyboard
Adjust the clip length.
-
Select the storyboard to edit on the sidebar in advance.
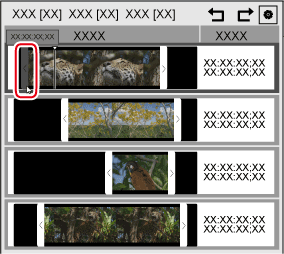
1) Drag the trimming bar at the both ends of a clip in the thumbnail pane to the right or left.

-
The timecode of the position is displayed on the trimming bar while in a dragging operation. The image of the frame at the trimming bar position is also displayed in the preview pane.
-
The left trimming bar is not displayed for a still image clip. Only operations using the right trimming bar are available.

-
You can trim the In point side or Out point side from the slider position.
-
Move the slider to the position to set as In or Out point, right-click on a clip to trim, and then click [Set In Point] or [Set Out Point].
-
To trim the In point side from the slider position: [I]
-
To trim the Out point side from the slider position: [O]
-
-
You can switch the view to subclips by right-clicking on a clip and then clicking [Set as subclip]. Since subclips are zoomed to fit the width of the thumbnail pane, this option is useful when fine trimming adjustment is performed. Right-click on the subclip, and then click [Cancel subclip] to go back to the previous view.
Basic and Standard versions available Download the Basic version free for a limited time!
We have prepared two versions of Mync. The Basic version can be used by a wide range of individual users and the Standard version has advanced functions that enable use even in professional production environments. Right now, the Basic version can be downloaded for free. Please experience the ease-of-use provided by Mync before this offer ends in 06 2017.
- Basic
- Standard
 Basic
Basic Standard


